ADS-919MM 查看數據表(PDF) - Murata Power Solutions
零件编号
产品描述 (功能)
生产厂家
ADS-919MM Datasheet PDF : 8 Pages
| |||
ADS-919
®
®
CALIBRATION PROCEDURE
(Refer to Figures 2 and 3)
Any offset and/or gain calibration procedures should not be
implemented until devices are fully warmed up. To avoid
interaction, offset must be adjusted before gain. The ranges of
adjustment for the circuit of Figure 2 are guaranteed to
compensate for the ADS-919's initial accuracy errors and may
not be able to compensate for additional system errors.
All fixed resistors in Figure 2 should be metal-film types, and
multiturn potentiometers should have TCR’s of 100ppm/°C or
less to minimize drift with temperature.
A/D converters are calibrated by positioning their digital
outputs exactly on the transition point between two adjacent
digital output codes. This can be accomplished by connecting
LED's to the digital outputs and adjusting until certain LED's
"flicker" equally between on and off. Other approaches
employ digital comparators or microcontrollers to detect when
the outputs change from one code to the next.
For the ADS-919, offset adjusting is normally accomplished at
the point where the output bits are 0's and the LSB just
changes from a 0 to a 1. This digital output transition ideally
occurs when the applied analog input is +½ LSB (+305µV).
Gain adjusting is accomplished when all bits are 1's and the
LSB just changes from a 1 to a 0. This transition ideally
occurs when the analog input is at +full scale minus 1½ LSB's
(+9.999085V).
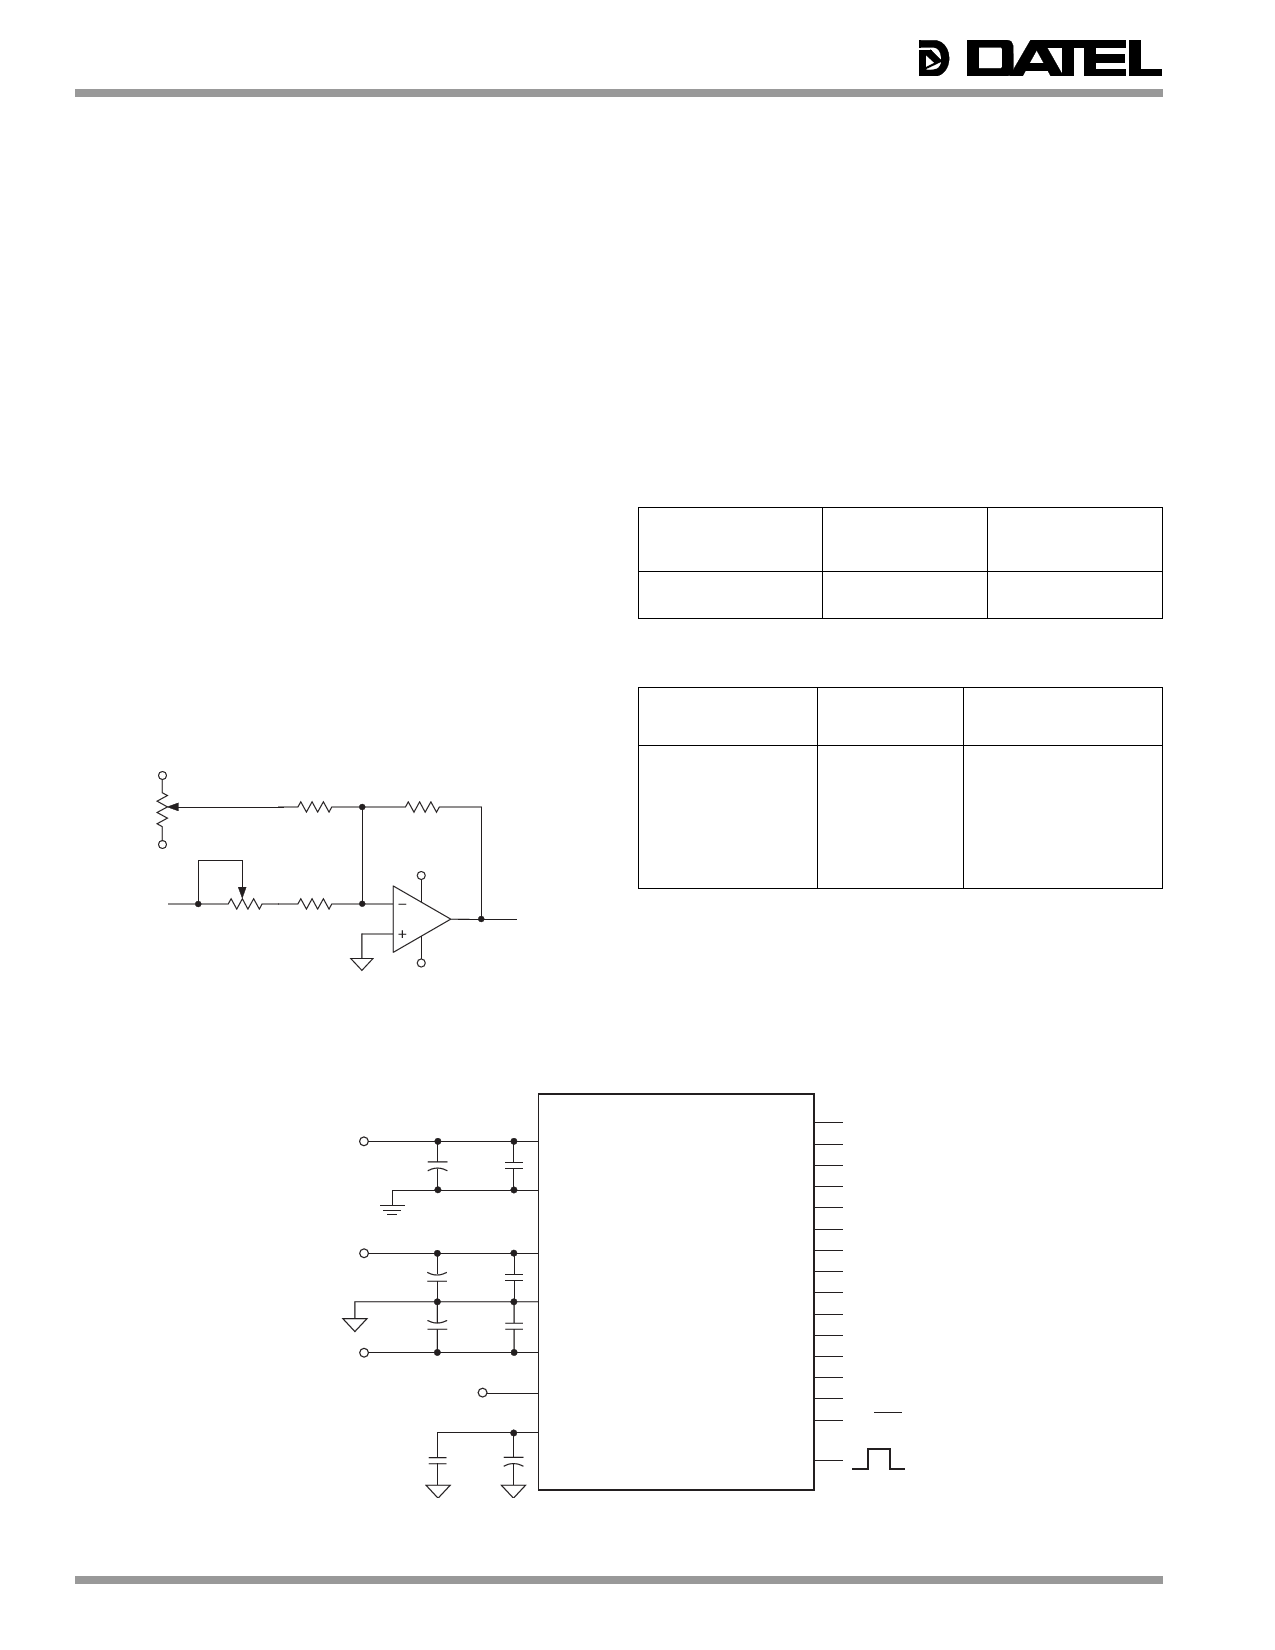
+15V
ZERO/
OFFSET
ADJUST
20kΩ
–15V
GAIN
ADJUST
SIGNAL
INPUT
50Ω
200kΩ
1.98kΩ
2kΩ
+15V
To Pin 20
of ADS-919
Zero/Offset Adjust Procedure
1. Apply a train of pulses to the START CONVERT input
(pin 16) so the converter is continuously converting. If
using LED's on the outputs, a 200kHz conversion rate will
reduce flicker.
2. Apply +305µV to the ANALOG INPUT (pin 20).
3. Adjust the offset potentiometer until the output bits are
all 0's and the LSB flickers between 0 and 1.
Gain Adjust Procedure
1. Apply +9.999085V to the ANALOG INPUT (pin 20).
2. Adjust the gain potentiometer until the output bits are all 1's
and the LSB flickers between 1 and 0.
Table 1. Zero and Gain Adjust
INPUT VOLTAGE
RANGE
0 to +10V
ZERO ADJUST
+½ LSB
+305µV
GAIN ADJUST
+FS –1½ LSB
+9.999085V
Table 2. Output Coding
INPUT VOLTAGE
(0 TO +10V)
UNIPOLAR
SCALE
DIGITAL OUTPUT
MSB
LSB
+9.999390
+7.500000
+5.000000
+2.500000
+0.000610
0.000000
+FS – 1LSB
+3/4FS
+1/2FS
+1/4FS
+1LSB
0
11 1111 1111 1111
11 0000 0000 0000
10 0000 0000 0000
01 0000 0000 0000
00 0000 0000 0001
00 0000 0000 0000
Coding is straight binary; 1LSB = 610µV.
–15V
Figure 2. ADS-919 Calibration Circuit
+5V
12V/15V
+12V/+15V
+
4.7µF
0.1µF
4.7µF
+
4.7µF
+
0.1µF
0.1µF
0 to +10V
0.1µF
+
4.7µF
13
14
DIGITAL
GROUND
ADS-919
24
19, 23
ANALOG
GROUND
22
ANALOG
20 INPUT
21 +10V REF. OUT
START
CONVERT
16
18 BIT 1 (MSB)
17 BIT 2
12 BIT 3
11 BIT 4
10 BIT 5
9 BIT 6
8 BIT 7
7 BIT 8
6 BIT 9
5 BIT 10
4 BIT 11
3 BIT 12
2 BIT 13
1 BIT 14 (LSB)
15 EOC
Figure 3. Typical ADS-919 Connection Diagram
4
Share Link: 